DIY RELIABILT Brand Mirrored Closet Doors Installation Directions [Lowe's Reliabilt Brand Doors] [3999UJpKHSI]
Hello guys, Welcome to Africa's Largest Video Search Engine, and you are watching DIY RELIABILT Brand Mirrored Closet Doors Installation Directions [Lowe's Reliabilt Brand Doors]. and this video is uploaded by DIYTechnician at 2023-01-11T19:52:44-08:00. We are just promoting this video only for entertainment and educational purpose only. I hop you like our Video Search Engine. [3999UJpKHSI]
Info About This Video
| Name |
DIY RELIABILT Brand Mirrored Closet Doors Installation Directions [Lowe's Reliabilt Brand Doors] |
| Video Uploader |
Video From DIYTechnician |
| Upload Date |
This Video Uploaded At 12-01-2023 03:52:44 |
| Video Discription |
Buy me a coffee? https://www.buymeacoffee.com/diytechnician Buy me a coffee? https://www.buymeacoffee.com/diytechnician Forgetting standard house maintenance items can be costly. Avoid this by using my homeowner's and renter's quick reference:
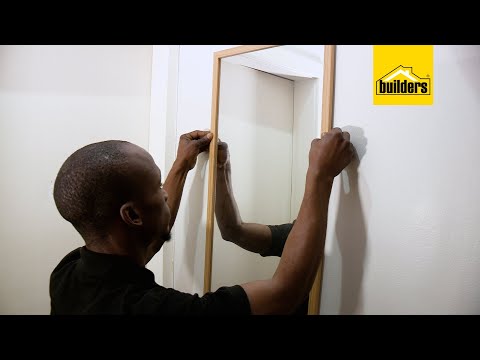
https://www.diy-technician.com/product-page/handy-homeowner-s-checklist Hi everybody in my "DIY RELIABILT Brand Mirrored Closet Doors Installation Directions [Lowe's Reliabilt Brand Doors]" video I unbox and install everything. With purchase of this "kit" I found that it comes with all of the parts necessary for install. You will need some basic tools to install this though. It should come with both the top track and the bottom rail track off to the side of the box. If you find this has been tampered with or opened be sure to check that both upper and lower rails/track are in the box before you leave the store. You'll likely need a drill and and hacksaw or handheld angle grinder install the upper and lower rails. Once you have them measured and cut, it's super easy to pop in the doors and then do the fine tuning adjustments. While you can do this job alone, it helps to have two people to get this done, especially for the holding and marking/measurement part.
This is the reliability Walden sliding ear door this is actually a 60 by 80 and a half it's gonna go up into this area here this measured 59 inches all the way across and the closet doors just because they're 60 they'll overlap a little bit so that's going to be perfect and then it was 81 high from underneath here so 80 and a half will work you won't even see it back here when we put the mounting up there and then the wheels will provide a little bit of lift for the bottom as well and this is part number 201 628
okay we got our closet doors here so you get two of those but also with the kit you get the this is going to go on the ground this is the slotted track here for it that's going to go on the ground and then this goes in the overhead one for each door and then you've got some instructions here that's what comes with the kit so you don't need to buy any extra in for tools I'm just going to use a Phillips head bit with a cordless drill and then also probably a couple uh drill bits all right you see these wheels here on the bottom that is that's what's gonna ride right in this these tracks here in this top portion these are meant to go like this this width will capture the the sliding rail for the top okay now it's time to Mark these things for cutting so I got that lined up even with that side I'm going to cut this side but I need to mark it so I'm going to go ahead and Mark it right here and cut it with the hacksaw
okay same thing for this top part I'm just going to push this all the way up against the wall there that's where it's going to sit and then it's going to mark it and trim it on that end okay it helps if you have somebody else hold it up then you can mark it exactly where to cut
foreign
got that cut to the correct length I'm not going to screw it in yet let's test fit this thing
all right that's gonna fit up nice in there
it was a screw it up to the overhead I'm just putting this in with drywall screws
okay I made a mark there exactly one inch in from where the the wall starts that way I can do it the same on the other side okay there's my mark for this side okay so now what I'm going to do is I'm going to drill three holes I'm going to go one about right there one about Center and then one a couple inches from that end
[Music]
okay now you just slide it up in here and the top goes in first foreign
there we go we're a little shallow right up here see I can actually push back all the way that's no problem I'll show you the fix here you got to come to the inside of the closet and what we're going to do is we're going to raise these up using these screws here
okay here's the other adjustment on here you can take these and just push them all the way up just like that do the same thing because for a nice extra adjustment get up in there okay now we got the one on there so you can put it on the front track or the back it doesn't matter because they're gonna they they're vice versa you can you can put that one closed and put this one on the left side as they're interchangeable I should say and now we'll just go ahead and put the other one on we'll put the other one on the front track there we go
okay next step is to slap these on to the side that's going to connect to the uh the door frame that way if the door slam it doesn't break the mirrors so these kind of cushion it a little bit so two on each side foreign
[3999UJpKHSI] |
| Category |
Howto & Style |
| Tags |
Howto & Style Download MP4 | Howto & Style Download MP3 | Howto & Style Download MP4 360p | Howto & Style Download MP4 480p | Howto & Style Download MP4 720p | Howto & Style Download MP4 1080p |
More Videos